 Blitz
Blitz
Blitz provides intelligent static page caching for creating lightning-fast sites with Craft CMS. It significantly improves a site’s performance by reducing server response time.
Cache Igniter can help keep your site’s cache warm around the globe and around the clock. In combination with Blitz, it is the ultimate performance setup for Craft.

Performance gains depend on server setup and connection latency. Google recommends a server response time of 200ms or less.
Features #
Speed
Blitz makes your site fly. By serving cached pages, load times are reduced to an absolute minimum, making your site feel light-weight and instantaneous to navigate.
Guess what? This site is powered by Blitz, so you can experience first-hand exactly how fast it really is! 🚀
Stability
Because your site’s pages are statically cached, the site remains available even when performing Craft updates and maintenance.
Cost Saving
Your web server no longer has to spin up PHP and render templates on each request. Statically cached pages can be served from a reverse proxy CDN such as Cloudflare or from a static host such as Netlify, meaning that you can deliver high performance sites using much more inexpensive servers.
Predictability
Cache invalidation happens automatically in the background as content is edited, making for a seamless author experience. The plugin is a breeze to set up, very configurable and thoroughly tested.
Extensibility
Blitz comes with built in cache storage, cache generators, reverse proxy purgers and deployers. Bring your own drivers for full control and customisation.
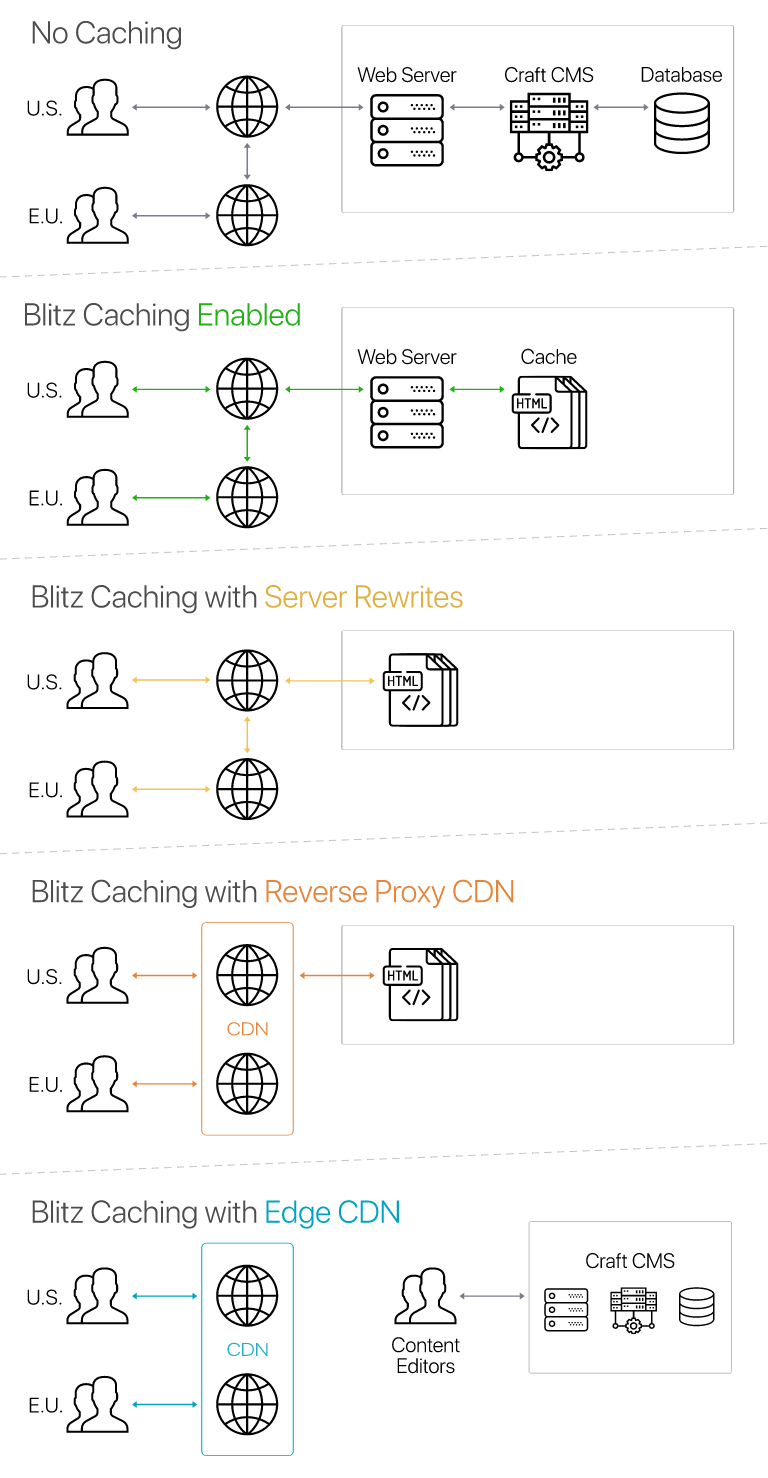
Below is a high-level overview of how Blitz works in its various configurations. Be sure to take a look at the Performance Testing Craft CMS with Blitz article for an eye-opening look at the impact of using Blitz.
License #
This plugin requires a commercial license purchasable through the Craft Plugin Store. The license fee is $99 plus $69 per subsequent year for updates (optional).
Requirements #
This plugin requires Craft CMS 3.2.1 or later, or 4.0.0 or later, or 5.0.0 or later.
Basic Usage #
Getting Started #
To install the plugin, search for “Blitz” in the Craft Plugin Store, or install manually using composer.
composer require putyourlightson/craft-blitz
Blitz will not make any changes to your site when first installed. To start caching pages, follow the 3 steps on the welcome screen.
- Enable caching.
- Select a refresh mode.
- Add at least one included URI pattern, for example
.*to cache the entire site.
Save the settings and your site pages will automatically be cached when visited. If you like, you can generate the entire cache using the Blitz Cache Utility.

That’s it! You should notice an immediate difference once Blitz is caching your pages. There are a few more optional steps you can take to cut even more time off that time-to-first-byte!
If you are using “Blitz File Storage” as the cache storage type (recommended), you can add Apache or Nginx server rewrites or PHP rewrites for even better performance.
You can reduce the likelihood of visitors hitting pages with expired entries (or entries with future post dates) by creating a cron job to refresh expired cache automatically on a scheduled interval.
Craft’s {% cache %} tag doesn’t always play well with Blitz cache invalidation. Since template caching becomes redundant with full page caching, it is best to remove {% cache %} tags from templates Blitz caches, or simply disable template caching from config/general.php:
'enableTemplateCaching' => false,
Layering Blitz on top of a poorly optimised site is not a great idea. Implementing some best practices will make a significant difference in how efficiently Blitz is able to track elements, refresh the cache and generally perform.
The Blitz Diagnostics utility can help you optimise the caching strategy and overall performance of your site.
If anything does not work as expected then take a look at the common issues.
How It Works #
When a page is visited that matches an included URI pattern, Blitz will serve a cached version of the page if one exists. Otherwise, it will render and cache the template output. Excluded URI patterns override any matching included URI patterns.
When an element is created, updated or deleted, any cached pages that output that element are either cleared immediately or marked as expired, depending on the selected refresh mode.
Blitz 4.4 added tracking of which custom fields are output per element per page, as well as which attributes and custom fields are changed on each element save. This dramatically reduces the number of cached pages that must be invalidated when content changes, as well as the number of element queries that must be executed during the cache refresh process.
If a reverse proxy purger such a Cloudflare is selected, the pages are purged. If the selected refresh mode includes regenerating, a job is queued to regenerate the cache. If a remote deployer is selected then the generated pages will be deployed to the remote location.
Blitz is compatible with Craft’s Live Preview. It will detect when live preview is being used and prevent its output from being cached.
Cache Widget #
The Blitz Cache dashboard widget contains the ability to refresh specific URIs, all pages in a site, or the entire cache. Its user interface is much more focused and approachable than the Blitz Cache Utility, which provides more functionality than many users will need.

Cache Utility #
The Blitz Cache Utility displays the number of cached URIs for each site (works with Blitz File Storage only). It also provides the following functionality.
Clear Cache #
Clearing the cache deletes all cached pages.
Flush Cache #
Flushing the cache deletes all records from the database.
Purge Cache #
Purging the cache deletes all cached pages in the reverse proxy.
Generate Cache #
Generating the cache creates a queue job to generate, regenerate or in some cases remove, all of the cached pages.
Deploy to Remote #
Deploying to remote creates a queue job to deploy all cached files to the remote location. If you want to ensure that every cacheable page is deployed then you should generate the cache first.
Refresh Cache #
Refreshing the cache clears, flushes, purges, generates and deploys all of the pages.
Refresh Expired Cache #
Refreshing expired cache refreshes all cached pages that have expired, or that contain elements that have expired (applies to elements with future post and expiry dates). Cache duration and expiry dates can be specified in the config settings and the page specific options.
Refresh Cached URLs #
Refreshing cached URLs refreshes all cached pages matching the provided URLs (the * wildcard is supported).
Refresh Tagged Cache #
Refreshing tagged cache refreshes all cached pages that have been associated with the provided tags using the tags parameter in the page specific options.

Console Commands #
Every cache utility function above is also available as a console command.
php craft blitz/cache/clear
php craft blitz/cache/flush
php craft blitz/cache/purge
php craft blitz/cache/generate
php craft blitz/cache/deploy
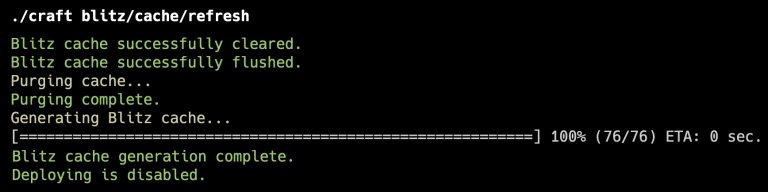
php craft blitz/cache/refresh
php craft blitz/cache/refresh-expired
php craft blitz/cache/refresh-urls https://domain.com/page/*
php craft blitz/cache/refresh-tagged tag1,tag2,tag3
A console command also exists that generates entry expiry dates and stores them to enable refreshing expired cache. This happens automatically when entries are saved but this command allows you to manually generate expiry dates for all of their entries.
php craft blitz/cache/generate-expiry-dates
Adding
--queue=1to the end of most of the commands will force jobs to only be queued and not run immediately.php craft blitz/cache/refresh --queue=1
Refreshing Cache via URL #
Once you have created an API key in Settings → Advanced, you can trigger each of the cache utilities through a URL. Those URLs are displayed under the API key field after the setting has been saved.

Diagnostics Utility #
The Blitz Diagnostics utility helps you better understand how your site’s cached content is structured, allowing you to optimise the caching strategy and overall performance of your site.
It provides useful recommendations based on your current configuration and allows you to generate a report when requesting support.
Read the Blitz Diagnostics announcement →

Hints Utility #
The Blitz Hints utility was retired in version 5.10.0.
Settings #
Control Panel Settings #
Caching Enabled #
With this setting enabled, Blitz will begin caching pages according to the included/excluded URI patterns. Disable this setting to prevent Blitz from caching any new pages.
Refresh Mode #
The refresh mode determines when and how the cache should be refreshed.
Clear the cache and regenerate in a queue job #
Select this if updated content should be applied as soon as possible and if cached pages should be automatically regenerated. This is recommended for the majority of sites and provides a healthy balance between applying content updates immediately and keeping the cache warm.
Expire the cache and regenerate in a queue job #
Select this for higher traffic sites, to continue serving expired (stale) cached pages until they are automatically regenerated. This results in the cache staying warm at all times, but content updates won’t be immediately visible. Also know as stale-while-revalidate, in which the revalidation is triggered automatically via a queue job.
Clear the cache, regenerate manually or organically #
Select this if updated content should be applied as soon as possible but if cached pages should be regenerated manually (via a cron job) or organically (when pages are visited). This results in content updates being immediately visible, while reducing load on the server.
Expire the cache, regenerate manually or organically* #
Select this for higher traffic sites, to continue serving expired (stale) cached pages until they are regenerated manually (via a cron job) or organically (when pages are visited, see the note below). This results in the cache staying warm at all times, but content updates won’t be visible until a cron job executes the blitz/cache/refresh-expired console command. Also know as “stale-while-revalidate”, in which the revalidation is triggered manually or at scheduled intervals.
*Organic regeneration can only work when requests reach the web server, meaning that when using server or PHP rewrites, cached pages must be regenerated manually.
Included/Excluded URI Patterns #
The URI patterns to include or exclude when caching. Blitz will only cache pages whose URI matches the URI patterns, giving you fine-grain control over what is cached.
URI patterns use regular expressions (view the PHP docs or this cheat sheet). Below are some common use cases.
| Pattern | Description |
|---|---|
| A blank field matches the homepage. | |
. | Matches any character. |
.* | Matches any character 0 or more times. |
.+ | Matches any character 1 or more times. |
\d | Matches any digit. |
\d{4} | Matches any four digits. |
\w | Matches any word character. |
\w+ | Matches any word character 1 or more times. |
entries | Matches anything containing entries. |
^entries | Matches anything beginning with entries. |
^entries/entry$ | Matches the exact URI entries/entry. |

Cache Storage #
The storage type to use for storing cached pages. The default and recommended storage type for most sites is “Blitz File Storage”. This stores cached pages as static HTML files in the specified “Folder Path” and is extremely performant, especially when used with server rewrites.
Since cached files are stored in the public web root, it is highly recommended to exclude the cache folder path from search engine indexing via a robots.txt file.
User-agent: *
Disallow: /cache/
With the “Compress Cached Values” setting enabled, Blitz will compress cached files using gzip and write them to
index.html.gzfiles for improved performance (requires extra code in server rewrites). Note that this will only impact direct requests to your web server – it won’t make much of a difference if using Cloudflare or another reverse proxy to cache your HTML.
A “Yii Cache Storage” type is also available and will use whatever cache component Craft is set up to use. You can configure Craft to use alternative cache storage (Memcache, Redis, etc.) by overriding the cache application component from config/app.php as explained in the Craft docs. This is the recommended storage type for multi-node cloud platforms like Heroku and Kubernetes, as well as for hosts that use ephemeral storage like fortrabbit (using the Professional Stack) and Servd.
You can extend Blitz to add your own custom cache storage types.

Cache Generation #
The cache generator is used to generate, regenerate or in some cases remove cached pages. The default generator is the “HTTP Generator”. This generates the cache by sending HTTP requests to the cacheable pages on the site, therefore the site must be publicly accessible for this generator to work.
A “Local Generator” is also available for situations in which the site is not publicly accessible. This generates the cache by mocking requests and having Craft handle them without making any external requests.
You can extend Blitz to add your own custom cache generators.

Reverse Proxy Purging #
A purger to use for clearing cache in a reverse proxy. This allows you to use a reverse proxy cache service and CDN such as Cloudflare to deliver cached pages. Selecting a purger will tell Blitz to automatically purge the appropriate pages whenever they are updated.
Note that when using a reverse proxy to cache HTML, server rewrites should not be used, as they may bypass the
cache-controlheaders that Blitz sets.
View all available reverse proxy purgers or add your own.
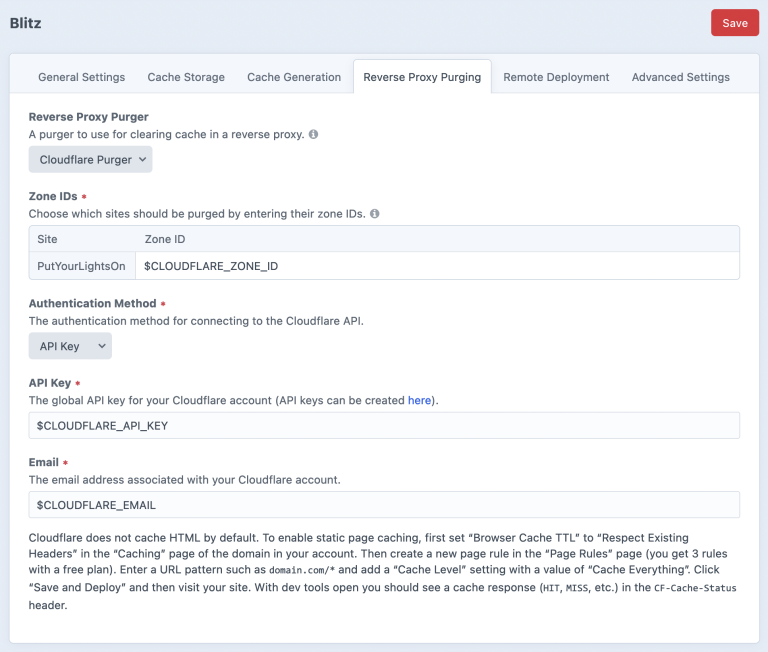
Cloudflare Cache Rules #
To enable static page caching in Cloudflare, create a new cache rule under Caching → Cache Rules. Configure the rule so that “All incoming requests” are “Eligible for cache”, select “Use cache-control header if present, bypass cache if not” under Edge TTL and “Respect origin TTL” under Browser TTL. Now with dev tools open you should see a cache response (HIT, MISS, etc.) in the CF-Cache-Status header when visiting the site.
Cloudflare Page Rules, which were previously recommended, can safely be migrated to Cache Rules and then removed.

Remote Deployment #
A deployer allows you to deploy cached files to a remote location such as a Git repository. This allows you to use a static host to deliver all (or part of) your site’s pages. Selecting a deployer will tell Blitz to automatically deploy the appropriate pages once they have been generated.
Read the article Deploying a Craft site to Netlify with Blitz 3 for instructions on how to set up Craft CMS to automatically deploy to Netlify Edge.
View all available remote deployers or add your own.
Advanced Settings #
SSI Enabled #
With this setting enabled, Blitz will fetch cached includes using Server-Side Includes (SSI), which must be enabled on the server.
Before setting up SSI, ensure that it is enabled on your production web server (the tip underneath the setting will let you know). While Nginx support for SSI is easy to enable, it can be tricky (or in some cases impossible, depending on your web host) to enable in Apache.
Server-Side Includes can be enabled on Apache as follows, with the AllowEncodedSlashes directive enabled.
#- Enable Server-Side Includes
#- https://httpd.apache.org/docs/current/howto/ssi.html
Options +Includes
AddOutputFilter INCLUDES .html .php
Server-Side Includes can be enabled on Nginx as follows.
#- Enable Server-Side Includes
#- https://nginx.org/en/docs/http/ngx_http_ssi_module.html
ssi on;
This will result in an SSI tag being output in the cached page, with the include rendered in the final HTML document that the browser receives.
<!--#include virtual="/_includes?action=blitz%2Finclude%2Fcached&index=12345" -->
Server-Side Includes can also be used in Caddy, as detailed in this GitHub issue.
For Server-Side Includes to work, the web server must be able to parse plain HTML, therefore files containing SSI includes will never be compressed using gzip.
ESI Enabled #
With this setting enabled, Blitz will fetch cached includes using Edge-Side Includes (ESI), which must be enabled on the server or in the caching layer user.
Query String Caching #
URLs with query strings will be cached according to the selected option in the “Query String Caching” setting as follows:
Do not cache URLs with query strings #
URLs with query strings (anything following a ? in a URL) will not be cached. Use this if query parameters dynamically affect a page’s output and should therefore never be cached.
Cache URLs with query strings as unique pages #
URLs with query strings will be cached as unique pages, so domain.com/about, domain.com/about?utm_source=twitter and domain.com/about?utm_source=facebook will be cached separately. Use when query parameters affect a page’s output in a deterministic way and can therefore be cached as unique pages.
Cache URLs with query strings as the same page #
URLs with query strings will be cached as the same page, so domain.com/about, domain.com/about?utm_source=twitter and domain.com/about?utm_source=facebook will all be cached with the same output. Use when query parameters do not affect a page’s output and can therefore be cached as the same page.
Included/Excluded Query String Parameters #
The query string parameters to include or exclude when caching a URL. These settings do not determine which pages are cached based on the query string. Instead, they can be used control which query string parameters are retained and which are disregarded in the URL.
Example 1
This example uses a liberal approach, including all query string parameters that are not explicitly excluded.
Included query string parameters: .*
Excluded query string parameters: utm_source
Visited URL: domain.com/about?x=1&y=2&z=3&utm_source=twitter
Cached URL: domain.com/about?x=1&y=2&z=3
Example 2
This example uses a conservative approach, including only query string parameters that are explicitly included.
Included query string parameters: x, y
Excluded query string parameters: none
Visited URL: domain.com/about?x=1&y=2&z=3&utm_source=twitter
Cached URL: domain.com/about?x=1&y=2
API Key #
An API key that can be used to clear, flush, generate, or refresh cache through a URL (min. 16 characters). The individual URLs are displayed below the field after a value has been saved.

Config Settings #
Blitz comes with a config file for a multi-environment way to set the plugin settings, as well as more advanced plugin configuration settings. To use it, copy the config.php to your project’s main config directory as blitz.php and uncomment any settings you wish to change. All available settings are listed and documented in the config file.
Advanced Usage #
Dynamic Content #
When a page is cached, the cached version of that page will be served up on all subsequent requests. You should therefore avoid caching pages whose entire content changes per individual request. The easiest way to do this is to add excluded URI patterns for such pages.
Blitz offers a workaround for injecting dynamic content into a cached page using an AJAX request. The Sprig and Datastar plugins provide more control and some added benefits when doing this.
Watch the CraftQuest livestream on how to use Sprig to inject dynamic content into statically-cached pages.
The following template tags are available for injecting dynamic content with Blitz.
{{ craft.blitz.includeDynamic() }} #
This function is useful for including a dynamic template – one whose content is never cached but is dynamically rendered by Twig each time it’s called. It returns a script that injects the contents of the template via an AJAX request.
{{ craft.blitz.includeDynamic(template, params) }}
A third options parameter can be passed into the function. Once common example is to add placeholder content that will be displayed until the result is swapped in.
{% set options = {
    placeholder: '<img src="/images/placeholder.svg">',
} %}
{{ craft.blitz.includeDynamic('path/to/template', { param1: 'value1' }, options) }}

Since requests are made via AJAX, only primitive data types should be passed in as parameters: strings, numbers, booleans and arrays. Objects, models and elements cannot be used. If you want to pass an element (or set of elements) into a dynamic include then you should pass in an ID (or array of IDs) instead and then fetch the element from within the template.
{{ craft.blitz.getTemplate() }} #
This function was deprecated in Blitz 4.3.0 and removed in 5.0.0. The includeDynamic() function should be used instead.
{{ craft.blitz.fetchUri() }} #
This function is useful for fetching the contents of a URI – one whose output may or may not be cached, depending on the included and excluded URI pattern settings. It returns a script that injects the contents of the URI via an AJAX request.
{{ craft.blitz.fetchUri(uri, params) }}
A third options parameter can be passed into the function. Once common example is to add placeholder content that will be displayed until the result is swapped in.
{% set options = {
    placeholder: '<img src="/images/placeholder.svg">',
} %}
{{ craft.blitz.fetchUri('/page/name', { param1: 'value1' }, options) }}
Since requests are made via AJAX, only primitive data types should be passed in as parameters: strings, numbers, booleans and arrays.
{{ craft.blitz.getUri() }} #
This function was deprecated in Blitz 4.3.0 and removed in 5.0.0. The fetchUri() function should be used instead.
{{ craft.blitz.csrfInput() }} #
This function fetches and injects a CSRF input field in place of the Twig tag via an AJAX request unless called within an AJAX request, in which case the value will be output inline.
Below is an example of how you might use the tags to create a page containing dynamic content and a form page that can be cached by Blitz.
Your cart: {{ craft.blitz.includeDynamic('_includes/cart-items') }}

<form method="post">
    {{ craft.blitz.csrfInput() }}
    ...
 </form>
{{ craft.blitz.csrfParam() }} #
This function fetches and injects the CSRF param in place of the Twig tag via an AJAX request unless called within an AJAX request, in which case the value will be output inline.
{{ craft.blitz.csrfToken() }} #
This function fetches and injects the CSRF token in place of the Twig tag via an AJAX request unless called within an AJAX request, in which case the value will be output inline.
JavaScript Events #
Whenever you use one of the tags above, the following JavaScript events become available for more fine-grained control.
// The `beforeBlitzInjectAll` event is triggered before any dynamic content is fetched
document.addEventListener('beforeBlitzInjectAll', function (event) {
    // The event can be cancelled with the following line
    event.preventDefault();
});

// The `beforeBlitzInject` event is triggered before each dynamic content tag is fetched
document.addEventListener('beforeBlitzInject', function (event) {
    // The event can be cancelled with the following line
    event.preventDefault();
});

// The `afterBlitzInject` event is triggered after each dynamic content tag is injected
document.addEventListener('afterBlitzInject', function (event) { });

// The `afterBlitzInjectAll` event is triggered after all dynamic content tags are injected
document.addEventListener('afterBlitzInjectAll', function (event) { });
CSRF Controller Actions #
The controller action blitz/csrf/input can be used to fetch an input field dynamically using AJAX, for example. The blitz/csrf/param and blitz/csrf/token controller actions are also available for fetching the CSRF param and a token respectively.
// Gets a CSRF input field
fetch('/actions/blitz/csrf/input')
    .then(result => { return result.text(); })
    .then(result => { console.log(result); });
    // Returns <input type="hidden" name="CRAFT_CSRF_TOKEN" value="t-xHRdO6WOsd4tYG1qvLIF4E_9SHlMs912YbvkjESTmhwa">

// Gets the CSRF param
fetch('/actions/blitz/csrf/param')
    .then(result => { return result.text(); })
    .then(result => { console.log(result); });
    // Returns CRAFT_CSRF_TOKEN

// Gets a CSRF token
fetch('/actions/blitz/csrf/token')
    .then(result => { return result.text(); })
    .then(result => { console.log(result); });
    // Returns t-xHRdO6WOsd4tYG1qvLIF4E_9SHlMs912YbvkjESTmhwa
Cached Includes #
craft.blitz.includeCached() #
This function is useful for including a cached template, especially when your server supports SSI or ESI. It works similarly to the regular include() function except that it is loaded via a Server-Side Include or an Edge-Side Include if enabled via the advanced settings.
{{ craft.blitz.includeCached(template, params) }}
The reason you might want to use this is that the included template will be cached as its own entity. If multiple pages use the cached include, and it outputs one or more elements, then any time those elements are updated, only the cached include will need to be regenerated.
For example, imagine your site contains mutliple pages, all of which output a button containing a call-to-action entry (or a nav bar, sidebar or footer containing entries).
{% set ctaEntry = craft.entries.slug('call-to-action').one() %}
<button>
    {{ ctaEntry.title }}
</button>

Now any time the call-to-action entry is updated, Blitz needs to regenerate the cache for all pages that reference it.
However, if we use the includeCached function, Blitz only needs to refresh one cached include, because all the other pages get their cached content included at request time.
{{ craft.blitz.includeCached('_includes/call-to-action') }}

For this to work with cached pages, at least one of SSI or ESI must be enabled, using the advanced settings, as well as on the web server. If neither SSI nor ESI is enabled, Blitz will fall back to using an AJAX request, which may be desirable in some cases.
Since requests are made via SSI, ESI or AJAX, only primitive data types should be passed in as parameters: strings, numbers, booleans and arrays. Objects, models and elements cannot be used. If you want to pass an element (or set of elements) into a cached include then you should pass in an ID (or array of IDs) instead and then fetch the element from within the template.
Page Specific Options #
It is possible to set page specific caching options in your twig templates by passing an object into the craft.blitz.options() function. All parameters are optional.
{% do craft.blitz.options({
    cachingEnabled: true,
    trackElements: true,
    trackElementQueries: true,
    cacheDuration: 'P1D',
    expiryDate: entry.eventDate,
    paginate: 10,
    tags: ['home', 'listing']
}) %}
An alternative notation is to use method chaining on the model that the craft.blitz.options function returns.
{% do craft.blitz.options.cacheDuration('P1D').tags(['home', 'listing']) %}
Because Blitz tracks elements and element queries in the same order that twig templates are parsed, you can change the options at various places in your templates.
{# Disable page options #}
{% do craft.blitz.options.trackElements(false).trackElementQueries(false) %}

{# Output global navigation #}
{% for entry in craft.entries.section('navigation').all() %}
    <a href="{{ entry.url }}">{{ entry.title }}</a>
{% endfor %}

{# Re-enable page options #}
{% do craft.blitz.options.trackElements(true).trackElementQueries(true) %}
cachingEnabled #
Setting this option to false will disable caching of the entire page. This option can only be used once per page, as partial template caching is not supported in Blitz.
trackElements #
Setting this option (previously named cacheElements) to false will disable tracking of the elements used on this page in the database. This is used for cache invalidation of pages when elements used on those pages are updated or deleted.
trackElementQueries #
Setting this option (previously named cacheElementQueries) to false will disable tracking of the element queries used on this page in the database. This is used for cache invalidation of pages when new elements are added that should appear on those pages.
cacheDuration #
The amount of time after which the cache should expire. If set to 0 then the cache will not get an expiry date. See ConfigHelper::durationInSeconds() for a list of supported value types. Duration intervals are a convenient way to set durations. Common examples include:
PT1H(1 hour)P1D(1 day)P1W(1 week)P1M(1 month)
expiryDate #
A DateTime object that will define when the cache should expire. The “Refresh Expired Cache” utility or console command must be used to invalidate expired cache.
paginate #
Setting this option makes it so that the current page will be marked for pagination of the specified number of pages when the page is next generated. So regenerating the cache will be necessary after this page has already been cached for the paginated pages to take effect.
A practical use-case for this option is to set it to the total pages for a paginated query.
{% paginate entryQuery as pageInfo, pageEntries %}

{% do craft.blitz.options.paginate(pageInfo.totalPages) %}
tags #
One or more tags (array or string separated by commas) that will be associated with this page. Tags should not contain spaces. The “Refresh Tagged Cache” utility or console command can be used to invalidate tagged cache.
php craft blitz/cache/refresh-tagged tag1,tag2,tag3
Cache tags can also be used to reduce the number of tracked element queries. An advanced use-case might be one in which each user has a unique entry listing page. Rather than track an element query for each user’s entries, we can disable element query tracking and tag the page by author ID.
{% do craft.blitz.options
    .trackElementQueries(false)
    .tags('author:' ~ authorId)
%}
Then, in a custom module/plugin, we can refresh the tag any time an entry is saved, using the author ID.
use craft\elements\Entry;
use craft\events\ModelEvent;
use putyourlightson\blitz\Blitz;
use yii\base\Event;

Event::on(Entry::class, Entry::EVENT_AFTER_SAVE,
    function(ModelEvent $event) {
        /** @var Entry $entry */
        $entry = $event->sender;
        $tag = 'author:' . $entry->getAuthorId();
        Blitz::$plugin->refreshCache->refreshCacheTags([$tag]);
    }
);
addTags #
A helper method to add tags to the existing tags in the options. This can be useful when you want to add tags from various templates, without overwriting existing tags.
{% do craft.blitz.options.addTags(['newTag1', 'newTag2']) %}
Source Tags #
You can tag pages using source tags in the format sourceIdAttribute:sourceId or sourceIdAttribute:* as a wildcard.
{# Tags the page with section ID 3. Any time an entry in that section is
   created, updated or deleted, the cached page will be refreshed. #}

{% do craft.blitz.options.tags('sectionId:3') %}
Then, any time an element in that source is created, updated or deleted, appropriately tagged pages will be cleared. This is especially useful if you have set the trackElements or trackElementQueries config settings to false, or if you have a unique scenario in which cached pages should be refreshed (such as very large or complex sites, see this related issue).
Blitz supports the following element source ID attributes:
sectionId(entries)groupId(categories)groupId(tags)typeId(Commerce products)campaignTypeId(Campaign campaigns)mailingListTypeId(Campaign mailing lists)
You can add your own source ID attributes using the sourceIdAttributes config setting.
Cron Jobs #
Create cron jobs using the following console commands to refresh expired or tagged cache on a scheduled interval. If entries are generally posted or expire on the hour then a good schedule might be every hour at 5 minutes past the hour.
// Refresh expired cache every hour at 5 minutes past the hour.
5 * * * * php /path/to/craft blitz/cache/refresh-expired

// Refresh cache tagged with the tags “home” and “listing” every day at 6am.
0 6 * * * php /path/to/craft blitz/cache/refresh-tagged home,listing
Custom Queues #
Blitz allows you to specify a custom queue to add jobs to. The benefit of this is that long-running queue jobs will can run independently of queue jobs in Craft’s default queue.
Here’s how to configure Blitz to use a custom queue in /config/app.php.
return [
    'bootstrap' => ['customQueue'],
    'components' => [
        'plugins' => [
            'pluginConfigs' => [
                'blitz' => [
                    'queue' => 'customQueue',
                ],
            ],
        ],
        'customQueue' => [
            'class' => \craft\queue\Queue::class,
            'channel' => 'custom',
        ],
    ],
];
For a full explanation of when and how to use custom queues, read Queue Runners and Custom Queues in Craft CMS.
Server Rewrites #
For improved performance when using the “Blitz File Storage” type, adding a server rewrite will avoid the request from ever being processed by Craft once it has been cached. This leads to extremely performant loading of cached pages.
Note that this will only impact direct requests to your web server – server rewrites should not be used when caching a reverse proxy is used to cache HTML.
Apache #
In Apache this is achieved with mod_rewrite by adding a rewrite rule to the virtual host .conf file (this article explains how), or the root .htaccess file if you must, just before the rewrites provided by Craft.
Change
cache/blitzto the cache folder path in the plugin settings, if different.
If the “Query String Caching” setting is set to Do not cache URLs with query strings or Cache URLs with query strings as unique pages then use the following code.
#- Blitz cache rewrite
RewriteCond %{DOCUMENT_ROOT}/cache/blitz/%{HTTP_HOST}/%{REQUEST_URI}/%{QUERY_STRING}/index.html -s
RewriteCond %{REQUEST_METHOD} GET
RewriteCond %{QUERY_STRING} !token= [NC]
RewriteRule .* /cache/blitz/%{HTTP_HOST}/%{REQUEST_URI}/%{QUERY_STRING}/index.html [L]

#- Send would-be 404 requests to Craft
If the “Query String Caching” setting is set to Cache URLs with query strings as the same page then the /%{QUERY_STRING} segment should be removed.
#- Blitz cache rewrite
RewriteCond %{DOCUMENT_ROOT}/cache/blitz/%{HTTP_HOST}/%{REQUEST_URI}/index.html -s
RewriteCond %{REQUEST_METHOD} GET
RewriteCond %{QUERY_STRING} !token= [NC]
RewriteRule .* /cache/blitz/%{HTTP_HOST}/%{REQUEST_URI}/index.html [L]

#- Send would-be 404 requests to Craft
If you are using the “Blitz File Storage” and have the “Compress Cached Values” setting enabled then adding the following before the Blitz cache rewrite will serve gzip files if they exist.
#- Blitz cache rewrite for gzip files
RewriteCond %{DOCUMENT_ROOT}/cache/blitz/%{HTTP_HOST}/%{REQUEST_URI}/%{QUERY_STRING}/index.html.gz -s
RewriteCond %{HTTP:Accept-encoding} gzip
RewriteCond %{REQUEST_METHOD} GET
RewriteCond %{QUERY_STRING} !token= [NC]
RewriteRule .* /cache/blitz/%{HTTP_HOST}/%{REQUEST_URI}/%{QUERY_STRING}/index.html.gz [L]

#- AddEncoding allows you to have certain browsers uncompress information on the fly.
AddEncoding gzip .gz

#- Serve correct content types, and prevent mod_deflate double gzip.
RewriteRule \.html\.gz$ - [T=text/html,E=no-gzip:1]

#- Blitz cache rewrite
Nginx #
In Nginx this is achieved by adding a location handler to the configuration file.
Change
cache/blitzto the cache folder path in the plugin settings, if different.
If the “Query String Caching” setting is set to Do not cache URLs with query strings or Cache URLs with query strings as unique pages then use the following code.
#- Blitz cache rewrite
set $cache_path false;
if ($request_method = GET) {
    set $cache_path /cache/blitz/$host/$uri/$args/index.html;
}
if ($args ~ "token=") {
    set $cache_path false;
}

#- Send would-be 404 requests to the cache path or Craft
location / {
    try_files $cache_path $uri $uri/ /index.php?$query_string;
}
If the “Query String Caching” setting is set to Cache URLs with query strings as the same page then the /$args segment should be removed.
#- Blitz cache rewrite
set $cache_path false;
if ($request_method = GET) {
    set $cache_path /cache/blitz/$host/$uri/index.html;
}
if ($args ~ "token=") {
    set $cache_path false;
}

#- Send would-be 404 requests to the cache path or Craft
location / {
    try_files $cache_path $uri $uri/ /index.php?$query_string;
}
If you are using the “Blitz File Storage” and have the “Compress Cached Values” setting enabled then adding the following before the Blitz cache rewrite will serve gzip files if they exist.
#- Enable serving of static gzip files as per https://docs.nginx.com/nginx/admin-guide/web-server/compression/#sending-compressed-files
gzip_static on;

#- Blitz cache rewrite
Caddy #
Server rewrites can also be used in Caddy, as detailed in this GitHub issue.
PHP Rewrites #
For situations in which your web host does not allow you to configure your servers, or you simply prefer not to, it’s possible to get the benefit of rewrites using the rewrite.php file that ships with Blitz.
Use it by requiring rewrite.php inside the web/index.php file (in the public web folder), directly after bootstrap.php is required.
// Load shared bootstrap
require dirname(__DIR__) . '/bootstrap.php';

// Load Blitz rewrite
require CRAFT_VENDOR_PATH . '/putyourlightson/craft-blitz/src/rewrite.php';
This rewrite happens via PHP, however it can still result in significant performance improvements, as observed in the “PHP File” versus “Early Craft Response” test results in the Load Testing Craft CMS article.
You can configure the rewrite by defining one or more constants. For example, if the Query String Caching setting is set to Cache URLs with query strings as the same page, then set BLITZ_INCLUDE_QUERY_STRING to false.
// Load Blitz rewrite without query strings and with a custom cache folder path
define('BLITZ_INCLUDE_QUERY_STRING', false);
define('BLITZ_CACHE_FOLDER_PATH', 'path/to/cache');
require CRAFT_VENDOR_PATH . '/putyourlightson/craft-blitz/src/rewrite.php';
Debugging #
Cached HTML pages are timestamped with a comment at the end of the page, unless the outputComments config setting is set to false.
<!-- Cached by Blitz on 2019-06-15T21:00:00+02:00 -->
If the HTML was served by the plugin rather than with a server rewrite then an additional comment is added.
<!-- Served by Blitz on 2019-06-15T21:00:00+02:00 -->
Note that if the “Compress Cached Values” setting is enabled, the “Served by Blitz” comment will not appear. If your HTML is minified then all comments will be removed from the markup, including the comments above.
If the HTML was served by the plugin and the sendPoweredByHeader config setting is not set to false then an X-Powered-By: Blitz header will be sent.
Logs are written to storage/logs/blitz-*.log. A debug config setting exists that can be enabled to help troubleshoot why pages are not being cached.
return [
    'debug' => true,
];
If pages are not being cached as expected then take a look at the common issues.
Extending Blitz #
Cache Storage Types #
In addition to the provided cache storage types, you can write your own by extending the BaseCacheStorage abstract class. See the implementation of the putyourlightson\blitz\drivers\storage\FileStorage class.
use putyourlightson\blitz\drivers\storage\BaseCacheStorage;

class MyCacheStorage extends BaseCacheStorage
{
    // Override base methods
}
To add your cache storage type to Blitz, you can create a stand-alone composer package for it. Install the package with composer require and then add the class to the cacheStorageTypes config setting in config/blitz.php.
// The storage type classes to add to the plugin’s default storage types.
'cacheStorageTypes' => [
    'vendor\package\MyCacheStorage'
],
If you prefer to write your cache storage type as a module or plugin, then register it by listening for the EVENT_REGISTER_STORAGE_TYPES event and adding the class to the $event->types array.
use craft\events\RegisterComponentTypesEvent;
use putyourlightson\blitz\helpers\CacheStorageHelper;
use vendor\package\drivers\storage\MyCacheStorage;
use yii\base\Event;

Event::on(CacheStorageHelper::class,
     CacheStorageHelper::EVENT_REGISTER_STORAGE_TYPES,
     function(RegisterComponentTypesEvent $event) {
         $event->types[] = MyCacheStorage::class;
     }
);
Cache Generators #
In addition to the provided cache generators, you can write your own by extending the BaseCacheGenerator abstract class. See the implementation of the putyourlightson\blitz\drivers\generators\HttpGenerator class.
use putyourlightson\blitz\drivers\generators\BaseCacheGenerator;

class MyCacheGenerator extends BaseCacheGenerator
{
    // Override base methods
}
To add your cache generator to Blitz, you can create a stand-alone composer package for it. Install the package with composer require and then add the class to the cacheGeneratorTypes config setting in config/blitz.php.
// The generator type classes to add to the plugin’s default generator types.
'cacheGeneratorTypes' => [
    'vendor\package\MyCacheGenerator'
],
If you prefer to write your cache generator as a module or plugin, then register it by listening for the EVENT_REGISTER_GENERATOR_TYPES event and adding the class to the $event->types array.
use craft\events\RegisterComponentTypesEvent;
use putyourlightson\blitz\helpers\CacheGeneratorHelper;
use vendor\package\drivers\generators\MyCacheGenerator;
use yii\base\Event;

Event::on(CacheGeneratorHelper::class,
     CacheGeneratorHelper::EVENT_REGISTER_GENERATOR_TYPES,
     function(RegisterComponentTypesEvent $event) {
         $event->types[] = MyCacheGenerator::class;
     }
);
Reverse Proxy Purgers #
Available cache purgers:
- CloudFront Purger (by PutYourLightsOn)
- KeyCDN Purger (by PutYourLightsOn)
- Fastly Purger (by Mango Chutney)
- Varnish Purger (by Statik)
In addition to the reverse proxy purgers above, you can write your own by extending the BaseCachePurger abstract class. See the implementation of the putyourlightson\blitz\drivers\purgers\CloudflarePurger class.
use putyourlightson\blitz\drivers\purgers\BaseCachePurger;

class MyCachePurger extends BaseCachePurger
{
    // Override base methods
}
To add your cache purger to Blitz, you can create a stand-alone composer package for it. Install the package with composer require and then add the class to the cachePurgerTypes config setting in config/blitz.php.
// The purger type classes to add to the plugin’s default purger types.
'cachePurgerTypes' => [
    'vendor\package\MyCachePurger',
],
If you prefer to write your cache purger as a module or plugin, then register it by listening for the EVENT_REGISTER_PURGER_TYPES event and adding the class to the $event->types array.
use craft\events\RegisterComponentTypesEvent;
use putyourlightson\blitz\helpers\CachePurgerHelper;
use vendor\package\drivers\purgers\MyCachePurger;
use yii\base\Event;

Event::on(CachePurgerHelper::class,
     CachePurgerHelper::EVENT_REGISTER_PURGER_TYPES,
     function(RegisterComponentTypesEvent $event) {
         $event->types[] = MyCachePurger::class;
     }
);
Remote Deployers #
Available remote deployers:
- Shell Deployer (by PutYourLightsOn)
- Netlify Deployer (by PutYourLightsOn)
While the Netlify Deployer provides a quick and easy setup, the Git Deployer is the recommended way of deploying full websites to Netlify sites.
In addition to the provided Git Deployer, you can write your own by extending the BaseDeployer abstract class. See the implementation of the putyourlightson\blitz\drivers\deployers\GitDeployer class.
use putyourlightson\blitz\drivers\deployers\BaseDeployer;

class MyDeployer extends BaseDeployer
{
    // Override base methods
}
To add your deployer to Blitz, you can create a stand-alone composer package for it. Install the package with composer require and then add the class to the deployerTypes config setting in config/blitz.php.
// The deployer type classes to add to the plugin’s default deployer types.
'deployerTypes' => [
    'vendor\package\MyDeployer',
],
If you prefer to write your deployer as a module or plugin, then register it by listening for the EVENT_REGISTER_DEPLOYER_TYPES event and adding the class to the $event->types array.
use craft\events\RegisterComponentTypesEvent;
use putyourlightson\blitz\helpers\DeployerHelper;
use vendor\package\drivers\deployers\MyDeployer;
use yii\base\Event;

Event::on(DeployerHelper::class,
     DeployerHelper::EVENT_REGISTER_DEPLOYER_TYPES,
     function(RegisterComponentTypesEvent $event) {
         $event->types[] = MyDeployer::class;
     }
);
Integrations #
You can add integration with Blitz to your own custom or third-party plugin/module. This is especially useful if elements are being created/updated in bulk.
Alternatively, you can create an integration for a third-party plugin by implementing the IntegrationInterface class. See the implementation of the putyourlightson\blitz\drivers\integrations\FeedMeIntegration class.
use putyourlightson\blitz\Blitz;
use putyourlightson\blitz\drivers\integrations\IntegrationInterface;
use yii\base\Event;

class MyIntegration implements IntegrationInterface
{
    public static function getRequiredPlugins(): array
    {
        return [
            ['handle' => 'my-plugin-handle', 'version' => '2.0.0']
        ];
    }

    public static function registerEvents()
    {
        Event::on(MyPlugin::class, MyPlugin::EVENT_BEFORE_PROCESS_FEED,
            function() {
                // Do some pre-processing
            }
        );
    }
}
To add your integration to Blitz, you can create a stand-alone composer package for it. Install the package with composer require and then add the class to the integrations config setting in config/blitz.php.
// The integrations to initialise.
'integrations' => [
    'vendor\package\MyIntegration',
],
If you prefer to write your integration as a module or plugin, then register it by listening for the EVENT_REGISTER_INTEGRATIONS event and adding the class to the $event->types array.
use craft\events\RegisterComponentTypesEvent;
use putyourlightson\blitz\helpers\IntegrationHelper;
use vendor\package\drivers\integrations\MyIntegration;
use yii\base\Event;

Event::on(IntegrationHelper::class,
     IntegrationHelper::EVENT_REGISTER_INTEGRATIONS,
     function(RegisterComponentTypesEvent $event) {
         $event->types[] = MyIntegration::class;
     }
);
More #
Best Practices #
Layering Blitz on top of a poorly optimised site is not a great idea. Implementing the following “best practices” will make a significant difference in how efficiently Blitz is able to track elements, refresh the cache and generally perform.
1. Eager-load Elements #
Always use eager-loading in your templates.
2. Avoid using Globals #
Globals are preloaded on every page in your site. Therefore, whenever a Global is saved, Blitz will refresh the entire site cache, unless the refreshCacheAutomaticallyForGlobals config setting is set to false. Entries, on the other hand, give you much more control over what is eager versus lazy loaded. Globals are being entrified in Craft 5, and Craft 4.4 introduced the entrify/global-set command for easily converting global sets to entries.
3. Use Cached Includes #
If your server supports SSI or ESI then using cached includes for template partials that include elements and that are used in multiple pages can make the cache refresh process much more efficient.
The Blitz Diagnostics utility can help you optimise the caching strategy and overall performance of your site.
Common Issues #
“The site is not cached when I visit it” #
Ensure that the Caching Enabled setting is enabled and that the page you are visiting matches an Included URI Pattern (and not an Excluded URI Pattern). Blitz will not cache pages that display the debug toolbar so check that you are not logged in as an admin with the debug toolbar enabled on the front-end. Blitz will also not cache pages that contain asset transform generation URLs, as doing so can lead to cached pages that perform poorly (see this issue). To work around this, you can set the generateTransformsBeforePageLoad config setting to true. Finally, if nothing else seems to be working, setting the debug config setting to true will make Blitz log detailed messages to storage/logs/blitz-*.log which may give you some clues.
“The site is not cached or not cleared when using console commands” #
Avoid using the @web alias in the site’s Base URL. It is best to provide an absolute URL, define an alias, or use a config setting or environment variable whenever possible. Ensure also that your site is switched on and is publicly accessible.
As per the Craft docs, if your web root is something besides web/, public/, public_html/, or html/, or it’s not located alongside your Craft executable, you will also need to override the @webroot alias, so it can be defined properly for console commands.
“The refresh cache queue job is stalling” #
This is likely due to PHP timing out or running out of memory and is a common issue in Craft. For content-heavy sites we highly recommend running the queue via a daemonised queue runner, see Queue Runners and Custom Queues in Craft CMS. If queue jobs must be run via web requests then increasing max_execution_time to 300 and memory_limit to 1024M is suggested.
The Async Queue plugin can be unreliable when used in certain web servers and has been known to cause queue jobs to stall.
“The refresh cache queue jobs run for long periods of time and sometimes pile up” #
For large sites, sites that don’t use eager-loading of elements in the templates, or sites that contain many relationships between elements, Blitz may need to check against thousands of element queries each time a refresh cache queue job is run. Blitz version 4.4 added improvements that greatly reduce the number of element queries that must be executed during the cache refresh process.
If updating to Blitz 4.4 is not possible and your site’s content editing experience is being negatively impacted the then it may be worthwhile setting the trackElementQueries config setting to false (followed by refreshing the cache). With this setting disabled, Blitz will be unable to automatically refresh cached pages when new elements are added (updating and deleting elements will still trigger a refresh).
To work around this, you can add source tags to pages that should be refreshed whenever an element in a section, category group, or another supported element source is created, updated or deleted.
{# Disables tracking element queries and tags the page with section ID 3 #}
{% do craft.blitz.options
    .trackElementQueries(false)
    .tags(['sectionId:3'])
%}

{% for entry in craft.entries.sectionId(3).all() %}
    ...
{% endfor %}
“The cache generation process causes the server to crash” #
The cache generation process (warming the cache) consists of sending a request to the web server for each page. The HTTP Generator does this over HTTP requests, much like a regular site visitor, whereas the Local Generator does this via PHP processes. Regardless of which generator you use, if your site is not optimised for performance then it will struggle with lots of concurrent requests. So the first step should be to optimise the site using eager-loading.
Reducing the generator concurrency to 1, which means that at most 1 request at a time will be made to the server, will also help reduce the load on the server but will also result in slower cache generation. If that still doesn’t help, then you can disable cache generation by selecting a refresh mode that refreshes the cache manually (Clear the cache, regenerate manually or organically, for example).
“The entire cache is refreshed when only one entry is updated” #
This is likely due to that entry being referenced in the site’s navigation, footer, or other globally used element. If the entry is updated, then every cached page (in this case the entire site) must be cleared to ensure that the changes to that entry are reflected. This is avoidable in one of several ways.
- Use cached includes for template partials that include elements and that are used in multiple pages.
- Hard-code the entry’s title and URL instead of dynamically referencing it.
- Use a dedicated navigation plugin such as Navigation by Verbb.
- Disable trackElements and trackElementQueries using page specific options before outputting the navigation or footer, for example:
{# Disable page options #}
{% do craft.blitz.options.trackElements(false).trackElementQueries(false) %}

{# Output global navigation #}
{% for entry in craft.entries.section('navigation').all() %}
    <a href="{{ entry.url }}">{{ entry.title }}</a>
{% endfor %}

{# Re-enable page options #}
{% do craft.blitz.options.trackElements(true).trackElementQueries(true) %}
The consequence of this is that the cached page will not be cleared when elements in the global navigation are updated (unless they are used elsewhere on the page).
The Blitz Diagnostics utility can be used to find out what pages are tracking what elements and element queries (read the announcement).
Support #
Support is provided via GitHub issues and email at [email protected].
Have a suggestion to improve the docs? Create an issue with details, and we'll do our best to integrate your ideas.