 Snaptcha
Snaptcha (Simple Non-obtrusive Automated Public Turing test to tell Computers and Humans Apart) will validate all POST requests to the front-end of your site, meaning that it will work with any form and any plugin.
Note that since this will affect all POST requests, you must add the required template tag before enabling validation (see usage instructions).
Snaptcha requires no action on the part of the user and takes a privacy-first approach, not requiring a privacy badge nor a link to third-party terms of service (as Google’s Recaptcha does).
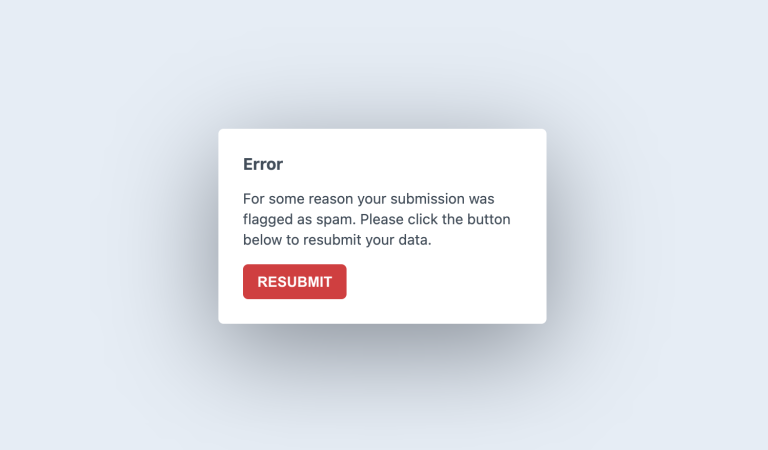
In the rare case that a submission is incorrectly marked as spam (a false negative), Snaptcha preserves the submitted data and allows for quick and seamless resubmission. Below is a side-by-side comparison of the user-experience of Snaptcha versus Recaptcha 3.
License #
This plugin requires a commercial license purchasable through the Craft Plugin Store. The license fee is $49 plus $29 per subsequent year for updates (optional).
Requirements #
This plugin requires Craft CMS 3.2.1 or later, or 4.0.0 or later, or 5.0.0 or later.
How Snaptcha works #
How Snaptcha works is no secret and there’s no magic behind the scenes. Snaptcha uses several factors to determine whether a POSTed form was submitted by a human or a spambot.
The first is that JavaScript must be enabled in the browser and that it must be allowed to execute a small logical operation. That is how the field value is generated on the front-end, which Snaptcha compares with the value stored in the back-end.
The second is that the “minimum submit time” (an adjustable number of seconds) must have passed between the time that the Snaptcha field was generated and the form was submitted.
The third is that the field must still be valid by not having already been used (if one-time key is enabled) and provided the “expiry time” (an adjustable number of minutes) has not yet passed.
Additionally, it is possible to disable Snaptcha validation for logged-in users (only recommended if public registration is not enabled), for specific controller actions and for specific IP addresses. All of these are available in the plugin settings.
What Snaptcha can(not) do #
From the explanation above, you may be wondering how Snaptcha protects submissions from human spammers. It is important to realise that Snaptcha is an automated spam protection tool that can only block out automated spam (from spambots). No automated tool can block out 100% of spam without relying on manual moderation (human intervention), and Snaptcha is no different in this regard.
Usage #
Installation #
To install the plugin, search for “Snaptcha” in the Craft Plugin Store, or install manually using composer.
composer require putyourlightson/craft-snaptcha
Getting Started #
After installing the plugin, go to the plugin settings page. Snaptcha validation is disabled by default so that you can first add the required template tag to your forms. Once you have done this you can enable Snaptcha validation.
Add the following template tag to every form that submits a POST request to your site. This will output a hidden input field along with some JavaScript code.
{# Outputs a hidden input field #}
{{ craft.snaptcha.field }}
If you want to be more fine-grained then you can get the field name and value as follows.
{# Outputs the name of the field #}
{{ craft.snaptcha.fieldName }}

{# Outputs a field value #}
{{ craft.snaptcha.fieldValue }}

{# Sample usage #}
{{ input('hidden', craft.snaptcha.fieldName, craft.snaptcha.fieldValue) }}

{# Sample usage #}
<input type="hidden" id="my-snaptcha-field"
    name="{{ craft.snaptcha.fieldName }}"
    value="{{ craft.snaptcha.fieldValue }}">
You can optionally use the getField and getFieldValue methods to pass in configuration values that will override the default values in the plugin settings.
{% set config = {expirationTime: 60, minimumSubmitTime: 3} %}

{# Outputs a hidden input field with the config values #}
{{ craft.snaptcha.getField(config) }}

{# Outputs a field value with the config values #}
{{ craft.snaptcha.getFieldValue(config) }}
Settings #
Validation Enabled #
With this setting enabled, Snaptcha will validate all forms submitted through POST requests. Ensure that all of your forms that submit via POST requests have the necessary tags in place before enabling this.
Validate Users #
Whether form submissions should be validated for logged-in users (recommended if public user registration is enabled).
One Time Key #
Enabling this will restrict the number of times that a form can be submitted to one time per page refresh. This is a strong security measure and is recommended for low to medium traffic sites. For high traffic sites, disabling this will prevent the database table that the plugin uses from getting too big.
Log Rejected #
Whether rejected form submissions should be logged. Logs will be written to storage/logs/snaptcha-****-**-**.log.
Field Name #
The name of the hidden Snaptcha input field.
Error Title #
The title that will be displayed if Snaptcha identifies a submission as spam.
Error Message #
The message that will be displayed if Snaptcha identifies a submission as spam.
Error JavaScript Disabled #
The error that will be displayed if Snaptcha identifies a submission as spam and JavaScript is disabled.
Error Button Text #
The button text that will be displayed if Snaptcha identifies a submission as spam.
Error Template #
The error template to use if Snaptcha identifies a submission as spam. Leave this blank to use the default error template.
Minimum Submit Time #
The minimum time for form submission in seconds. Increase this to harden spam protection.
Expiration Time #
The expiration time for form submissions in minutes.
Exclude Controller Actions #
The controller actions to exclude from validation. Example: users/save-user
Allow List #
IP addresses to allow for all form submissions.
Deny List #
IP addresses to deny for all form submissions.
Config Settings #
Snaptcha comes with a config file for a multi-environment way to set the plugin settings, as well as more advanced plugin configuration settings. To use it, copy the config.php to your project’s main config directory as snaptcha.php and uncomment any settings you wish to change. All of the available settings are listed and documented in the config file.
AJAX Requests #
If you are working with AJAX requests then you can get the field name and a value using a GET request.
// Gets the name of the field
fetch('/actions/snaptcha/field/get-field-name')
    .then(result => { return result.text(); })
    .then(result => { console.log(result); });
    // snaptcha

// Gets a field value
fetch('/actions/snaptcha/field/get-field-value')
    .then(result => { return result.text(); })
    .then(result => { console.log(result); });
    // abcdefg1234567

// Gets a raw input field
fetch('/actions/snaptcha/field/get-field')
    .then(result => { return result.text(); })
    .then(result => { console.log(result); });
    // <input type="hidden" name="snaptcha" value="abcdefg1234567">

// Gets a field in JSON format
fetch('/actions/snaptcha/field/get-field', {
    headers: {
        Accept: 'application/json'
    }})
    .then(result => {return result.json();})
    .then(result => { console.log(result); });
    // {name: "snaptcha", value: "abcdefg1234567"}
For security reasons, passing in configuration values is not allowed using controller actions.
If you are using Blitz to statically cache your pages then you can use its fetchUri tag together with the get-field controller action to dynamically inject the input field into your forms.
{# Dynamically fetches and outputs a hidden input field #}
{{ craft.blitz.fetchUri('/actions/snaptcha/field/get-field') }}
You can validate a field value using an AJAX request as follows.
// Validates a field value
fetch('/actions/snaptcha/field/validate-field-value?value=abcdefg1234567')
    .then(result => { return result.text(); })
    .then(result => { console.log(result); });
    // `success` or an error message

// Validates a field value with a result in JSON format
fetch('/actions/snaptcha/field/validate-field-value?value=abcdefg1234567'{
    headers: {
        Accept: 'application/json'
    }})
    .then(result => { return result.json(); })
    .then(result => { console.log(result); });
    // `{success: true}` or `{error: "The error message."}`
Disabling Validation #
Validation can be disabled by specifying controller actions to exclude. Adding a property called $enableSnaptchaValidation to any controller class and setting it to false will disable validation when the actions in that class are called.
class WebhookController extends Controller
{
  /**
   * @var bool Disable Snaptcha validation
   */
  public $enableSnaptchaValidation = false;
The EVENT_BEFORE_VALIDATE_FIELD event can also be used from your own plugin/module to bypass validation by setting skipValidation to true on the event.
use putyourlightson\snaptcha\events\ValidateFieldEvent;
use putyourlightson\snaptcha\services\SnaptchaService;
use yii\base\Event;

Event::on(SnaptchaService::class, SnaptchaService::EVENT_BEFORE_VALIDATE_FIELD,
    function (ValidateFieldEvent $event) {
        $actionId = $event->action ? $event->action->getUniqueId() : null;

        // Skips validation for the `users/save-user` controller action only
        if ($actionId === 'users/save-user') {
            $event->skipValidation = true;
        }
    }
);
Testing Snaptcha #
If you want to test or see how Snaptcha works on your site then navigate to one of your forms, open your browser’s inspector and delete the input field that Snaptcha inserted. It will usually be inside your form’s markup and will have an ID that begins with the prefix in your extension settings (snaptcha by default). After deleting the input field, submit the form and the error message should appear.
Have a suggestion to improve the docs? Create an issue with details, and we'll do our best to integrate your ideas.