We invited an independent contractor to measure the performance of a Craft CMS demo site and the impact of using Blitz, paying for their time and agreeing to publish their words without further influence or agenda. This is what they wrote.

You’re probably aware that Blitz can improve your Craft CMS site’s front-end performance. It says so in its marketing, and the plugin’s popularity suggests it’s doing something. In this post we’ll take an existing Craft site, see what Blitz can do with it, and see whatever difference it makes.

We’ll use the official Craft CMS Europa Museum demo to measure performance with and without Blitz. We’ll also look at what’s involved to get Blitz working and see if it’s worth the effort. This should be a well-rounded exploration of what a performant website is, with steps you can reproduce on your own.
What We’re Doing #
We’re going to fork a copy of the Europa demo, bring it up to date, and get it running on a Digital Ocean droplet provisioned with Ploi. We’ll look at how it performs, then move through a few rounds of optimization while testing again in each phase:
- Examine the initial base project.
- Implement native Craft
{% cache %}tags. - Switch from Craft’s cache tags to static caching with Blitz.
- Skip PHP altogether using Blitz server rewrites.
We deliberately won’t be using a CDN for most of our tests. While you’d want a CDN in production, services like Cloudflare and CloudFront come with features that limit excessive traffic and mess with our results. We want to keep our tests focused squarely on what our single web server can handle before we’ve layered services on top of it.
Setup #
Before we can get started, we’ll need to get our Craft site ready and run it on a web server. We’ll use Ploi to provision a Digital Ocean droplet and run our Europa fork.
We’ll also set up an instance of Locust on a separate server to do some basic load testing and see what happens when the web server gets busy.
These next sections walk through the test setup for anyone curious or wanting to do this themselves, but you can skip to Performance Testing for the results if you’d rather.
Base Project #
First we grab our own copy of the project to play with, and adjust dependencies so we can update it.
- Visit craftcms/europa-museum on GitHub and click Fork.
Clone your forked copy locally:
git clone https://github.com/your-username/europa-museum.gitReplace DynamoDB with redis for cache, queue, and sessions:
 composer remove craftcms/yii2-dynamodb
 composer require yiisoft/yii2-redis
Update Craft and its requirements:
composer updateWhile we’re here, open
config/app.phpto drop the Bugsnag component and support configuring redis with environment variables:<?php use craft\\helpers\\App; use modules\\demos\\Module; $components = []; if (App::env('REDIS_HOSTNAME')) { $components = array_merge( $components, [ 'redis' => [ 'class' => yii\\redis\\Connection::class, 'hostname' => App::env('REDIS_HOSTNAME'), 'port' => App::env('REDIS_PORT') ?? 6379, 'database' => App::env('REDIS_DEFAULT_DB') ?? 0, ], 'cache' => [ 'class' => yii\\redis\\Cache::class, 'redis' => [ 'hostname' => App::env('REDIS_HOSTNAME'), 'port' => App::env('REDIS_PORT') ?? 6379, 'database' => App::env('REDIS_CRAFT_DB') ?? 1, ], ], 'session' => [ 'class' => yii\\redis\\Session::class, 'as session' => [ 'class' => \\craft\\behaviors\\SessionBehavior::class, ], ], ] ); } return [ 'modules' => [ 'demos' => Module::class, ], 'bootstrap' => ['demos'], 'components' => $components ];Commit your changes and push them back to GitHub.
That will be enough to get an up-to-date version of the Europa site running. Now we can set up the variations of the site we intend to test.
Cache Tag Variant #
Our first variation of the Europa demo will use Craft’s native {% cache %} tags. These can be used to cache chunks of templates and reduce database queries on subsequent page requests. This built-in method of improving performance doesn’t require Blitz and it’s fairly straightforward to implement.
When using cache tags, you need to be careful with any dynamic output in your templates, like CSRF tokens for forms or conditional presentation changes that depend on the user or request.
I used a {% cache globally %} tag for the site’s unchanging header and footer templates, and a smattering of {% cache %} tags for most others — skipping the Matrix blocks on the contact page that currently include a contact form. One nice thing about the cache tag approach is that Craft’s still the one handling the request, so any part of a template not wrapped in {% cache %} tags will continue to work exactly the same.
I wrapped the header and footer pieces with a global cache tag like this:
{% cache globally %}
  {% include "_/partials/header" %}
{% endcache %}
I wrapped most other template innards with simple cache tags like this:
{% block content %}
  {% cache %}
    {# All the other stuff on the page #}
  {% endcache %}
{% endblock %}
This will probably take 15 – 30 minutes at most.
If you’re following along, commit these updates to a separate branch and push that to your GitHub repository for later.
Blitz Variant #
I switched back to my main branch to start the next variation, installing Blitz (at the latest version 4.2.3) to enable static caching.
Install Blitz like any other plugin:
composer require putyourlightson/craft-blitz
php craft plugin/install blitz
Blitz will now wait patiently until we tell it to do something. We’ll have it cache all pages by adding the following to a new config/blitz.php file:
return [
    'cachingEnabled' => true,
    'includedUriPatterns' => [
        [
            'siteId' => 1,
            'uriPattern' => '.*',
        ],
    ],
];
(You could accomplish the same thing via the control panel just like the Blitz docs demonstrate.)
This tells Blitz to cache every URL (.*) for our primary site (1). At this point it should be, so if you happen to be running the site locally you can view the source of any front-end page, scroll to the bottom and see these comments after the closing </html> tag:
<!-- Cached by Blitz on 2022-12-06T13:33:09-08:00 -->
<!-- Served by Blitz on 2022-12-06T13:33:36-08:00 -->
Cached by is telling us Blitz did indeed generate a static cache for the current page and we’re looking at it. Served by is telling us that Blitz also delivered us the page (via Craft), which we’ll address in our final variation.
But first we need to un-mangle the contact form.
Contact Form
Unlike Craft’s cache tags, we can’t partially opt out of full-page caching. It’s an all-or-nothing kind of deal.
So the form on the Contact page will have its hidden CRAFT_CSRF_TOKEN and Freeform formHash values frozen in time when the cache is generated, meaning nobody will be able to submit the form anymore unless we disable CSRF protection.
Should we disable CSRF protection? If you grimaced a little and whispered “of course not,” you are correct. Let’s fix it.
What we can do is let that static page do its thing and use a separate request to grab fresh form tokens. This is a common approach, demonstrated in the Freeform docs and for which Blitz provides options.
The front-end part of Freeform’s example requires jQuery, which we’re not using, so I loosely followed the instructions there for something more concise:
Create a
freeform-csrf.twigtemplate that’ll be a JSON endpoint we can query:{% header "Content-Type: application/json" %} {% set form = craft.freeform.form(craft.app.request.get('form')) %} {{ { hash: form.hash, honeypot: craft.freeform.honeypot(form), csrf: { name: craft.app.config.general.csrfTokenName, value: craft.app.request.csrfToken, } }|json_encode|raw }}Update the
_/components/blocks/form.twigtemplate so it uses an AJAX request to update the Freeform hash and CSRF token:{# Refresh form has and CSRF #} <script> fetch('/freeform-csrf?form={{ theBlock.form.id }}') .then(response => response.json()) .then(data => { const form = document.querySelector('#{{ freeformId }} form'); form.querySelector('input[name=formHash]').value = data.hash; form.querySelector('input[name=' + data.csrf.name + ']').value = data.csrf.value; }); </script>
Writing articles I can create an illusion of deftness and competence, but it took me about 45 minutes to get everything in place and whittled down to the point where forms kept working.
This brings us to the issue of the site’s landing page.
Landing Page

The second major section of the homepage is a clump of four “Featured Exhibits”, which are randomized as they’re queried in their Twig template. When we statically cache the page, that result is frozen in place and no longer random on each request.
My first stop was to move the exhibit Twig bits into their own template, and load that with {{ craft.blitz.getTemplate('my-template', { entry }) }}. But I don’t think Blitz was counting on me passing something as complex as an Entry element as a parameter, because the included template wasn’t convinced that entry.featuredExhibits existed.
It would have been possible to query the homepage entry directly in the new template instead of passing the entry parameter, except that it would have been loaded with AJAX and missed out on the page’s lazy loading and fancy scroll transitions that get initialized on page load.
Not willing to accept a tradeoff for visual presentation, I went where we all have to go sometimes: back to the front end.
You, dear reader, would have taken less time because you’re better at writing lovely and remarkably terse vanilla JavaScript. With hamfisted determination, I eventually figured out how to move the element-shuffling logic into JavaScript, reordering those exhibition items on the fly and making sure they had the right CSS classes and transition-speed markup.
Altogether I probably spent an hour and a half getting those two dynamic items — the contact form and the homepage-randomizing — ready for full-page caching.
Blitz Variant with nginx Rewrite #
With the Blitz branch ready, the final testing variation was quick.
In this one we use a server rewrite that lets us completely skip PHP when Blitz has a static file ready, having nginx send the file contents directly instead.
There’s nothing to change in your repository; this is handled completely on the server with an edit to the nginx configuration.
Just so you’re not in suspense, it means using Ploi’s control panel to visit Sites → your site → Manage, and click NGINX configuration. We’ll make two adjustments:
Just above the existing
location / {line, add this:set $cache_path false; if ($request_method = GET) { set $cache_path /cache/blitz/$host/$uri/$args/index.html; } if ($args ~ "token=") { set $cache_path false; }Within that location block, add
$cache_pathjust aftertry_files:# try_files $uri $uri/ /index.php?$query_string; try_files $cache_path $uri $uri/ /index.php?$query_string;
Click Save, then Test configuration to the right (safety step!), and finally Deploy to make the change live.
We’re telling nginx we’d like a $cache_path variable. For GET requests, this variable will point to where we’d expect a Blitz .html cache file to live by default. (A token parameter in the URL will disable this behavior.)
When nginx is trying to figure out where to grab a response, it’ll now check $cache_path before looking at the file system or passing off to PHP. If $cache_path is false, nginx will move on and try the next thing, but an appropriate HTML response will do the trick. If the cached .html file is there, nginx sends its contents back without needing to further check local files or hand off to PHP.
You can verify this is working by visiting a page on the front end and looking for the HTML comments we saw earlier. There should only be a Cached by line, and not a Served by one:
<!-- Cached by Blitz on 2022-12-06T13:33:09-08:00 -->
If you need more proof, dig into web/cache/blitz/site.tld/, pop open an HTML file, and add your own sassy comment. You should find your edit on the corresponding page in your browser, which may need a hard refresh.
Even though we need to do this on the web server, it should take less than five minutes.
Web Server #
Now our site’s ready to test in different configurations, so we can scoot it out onto the internet.
We’ll need two servers: one for the Europa site and another to run Locust for load testing, because we don’t want the site and the load-tester sharing resources and muddling our results.
In the course of writing this article, I used nine servers: a 2‑core NVMe VPS for running Locust, along with two from Katapult (pure curiosity), and six from Digital Ocean. I’ll share some of what I learned trying all these different servers, but we’ll stick to one test case to limit the word count here.
Every Digital Ocean server I used for the results below had the exact same specs. I learned not every server — despite identical location, specs, and time of day — performs identically, but we’ll come back to that later.
- 2 CPUs
- 2GB of memory
- Ubuntu 20.04
- San Francisco 3
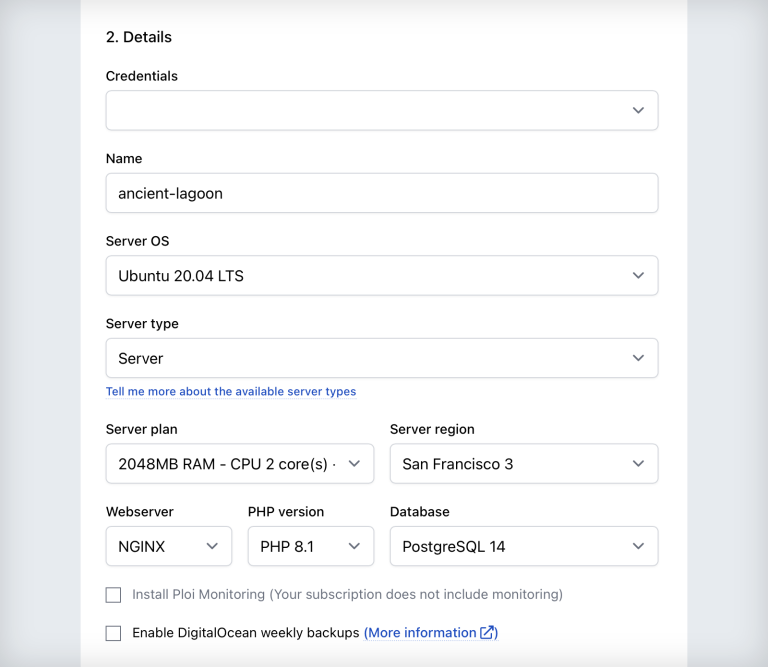
When provisioning with Ploi, I picked modern options for that demo site:
- Server type: Server
- Webserver: NGINX
- PHP version: 8.1
- Database: PostgreSQL 14
With the server ready, I configured a few common things to make Craft happy (green checks in Utilities → System Report → Requirements) and production-ready:
- Increased PHP’s memory limit to 256MB
- Increased PHP’s timeout to 120 seconds
- Enabled OPcache
Then it was a matter of getting the site set up with its supporting pieces in place:
- Add a database under Servers → your server name → Databases. I called mine
craftand left the other fields blank, using credentials from the server provision email. - Create a site under Servers → your server name → Sites. Use one of your spare domain names (I know you have some), setting Web directory to
/web. - Set a DNS A record to point your chosen domain name to the server’s IP address, easily copied from the top left of Ploi’s control panel.
- Add a site repository pointed to your fork.
- Run
composer install. Set your environment variables. You’ll need to update the environment, database settings, and site URL, and specify redis details.
 # Change to production!
 CRAFT_ENVIRONMENT=production

 # We’ll generate this in the next step
 CRAFT_SECURITY_KEY=

 # Database
 CRAFT_DB_DRIVER=pgsql
 CRAFT_DB_SERVER=localhost
 CRAFT_DB_PORT=5432
 CRAFT_DB_USER=ploi
 CRAFT_DB_PASSWORD=[from-email]
 CRAFT_DB_DATABASE=craft
 CRAFT_DB_SCHEMA=public
 CRAFT_DB_TABLE_PREFIX=

 # Use your testing domain here
 DEFAULT_SITE_URL=https://test-domain.tld

 # Use these verbatim for redis
 REDIS_HOSTNAME=127.0.0.1
 REDIS_PORT=6379
 REDIS_DEFAULT_DB=0
 REDIS_CRAFT_DB=1
Optionally daemonize redis to handle the queue. Disable the AJAX queue with an environment variable:
CRAFT_RUN_QUEUE_AUTOMATICALLY=falseCreate a daemon at the server level that runs as
ploiwith 1 process:/usr/bin/nice -n 10 /usr/bin/php8.1 /home/ploi/test-domain.tld/craft queue/listen --verboseSet up SSL under Sites → your site name → SSL, by clicking Add certificate.
SSH in to generate a security key, restore the included database dump, and create an admin user for yourself:
 php craft setup/security-key
 php craft db/restore seed.sql
 php craft users/create
If you can pop by your URL, you’ve got a site to test! You can create a test server for each phase, or use the same one to switch branches and redeploy.
I did all this eight times and got pretty efficient at it toward the end, but you might plan on it taking 30 minutes or so.
Load testing will just mean pointing at a URL we’ve prepared, so we’ll shuffle the site around for each configuration we test:
- The base setup we got ready.
- The native cache tag variation.
- The Blitz-installed statically-cached variation.
- That third item, plus the nginx rewrite we looked at above.
Load Testing #
Setting up a VPS to run Locust is almost painless.
The server should have Python installed, so you’ll need to grab a copy of Locust, increase the system’s max-open-file limit so Locust can do its thing, and write a brief script for your simulated user.
I used Locust 2.8.6 for everything you’ll see in the results. Following the Locust installation instructions, SSH into your droplet and install with pip3:
sudo apt-get install python3-pip
pip3 install locust
Locust’s executable is added to /home/ploi/.local/bin, so for convenience you’ll want to add that to your path or shell profile:
export PATH=/home/ploi/.local/bin:$PATH
You can run Locust now, but you’ll get a warning about your “system open file limit”:
System open file limit '1024' is below minimum setting '10000'.
Locust needs to be able to open lots of files while it conducts its tests. You can see what the limit is on your machine like this:
ploi@steve:~$ cat /proc/sys/fs/file-max
201125
ploi@steve:~$ ulimit -aS
core file size          (blocks, -c) 0
data seg size           (kbytes, -d) unlimited
scheduling priority             (-e) 0
file size               (blocks, -f) unlimited
pending signals                 (-i) 7883
max locked memory       (kbytes, -l) 65536
max memory size         (kbytes, -m) unlimited
open files                      (-n) 1024
pipe size            (512 bytes, -p) 8
POSIX message queues     (bytes, -q) 819200
real-time priority              (-r) 0
stack size              (kbytes, -s) 8192
cpu time               (seconds, -t) unlimited
max user processes              (-u) 7883
virtual memory          (kbytes, -v) unlimited
file locks                      (-x) unlimited
You can raise the limit as the root user by editing /etc/security/limits.conf and /etc/pam.d/common-session*, then restarting your shell session.
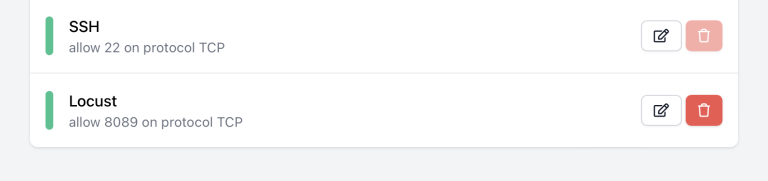
Lastly, visit Ploi’s Network section and allow Locust’s TCP port 8089 so we can use its browser GUI.
Now you can SSH into the droplet and run locust with its default test script. I very simply edited that script to navigate to each major page/layout on the Europa site:
from locust import HttpUser, task

class HelloWorldUser(HttpUser):
    @task
    def hello_world(self):
        self.client.get("/")
        self.client.get("/exhibitions")
        self.client.get("/visit")
        self.client.get("/news")
        self.client.get("/news/winter-night-tours")
        self.client.get("/about")
        self.client.get("/contact")
Press Control+C to stop the locust process and run it again. It’ll use your updated script for testing, which you can verify as the results accumulate.
Performance Testing #
Browser Metrics #
Most of us are used to thinking about a single user’s experience from their browser. I used KeyCDN’s Website Speed Test to score the homepage from San Francisco:
| Testing Configuration | Score | TTFB | Time |
|---|---|---|---|
| Stock (unoptimized) | 77 – C | 1.05 s | 2.45 s |
| Cache Tags | 83 – B | 241.35 ms | 1.57 s |
| Blitz | 83 – B | 108.51 ms | 1.4 s |
| Blitz + Rewrite | 83 – B | 33.4 ms | 242.25 ms |
The on-page score doesn’t change much because the assets and locations they’re served from are identical (with no CDN involved). What does change is how fast the web server is able to get to its initial response, which impacts the total page load time.
It’s immediately clear that any effort optimizing is worth it, with native cache tags significantly dropping the time to first byte and initial load time. Blitz’s static cache is zippier than native cache tags, but the rewrite pulls significantly ahead.
Things get more interesting with the load tests.
Load Tests #
Browser metrics give us a sense of performance for one site visitor, and load tests help us see how the server behaves with a bunch more visitors. You probably don’t expect one user at a time, but how much traffic can your infrastructure actually support?
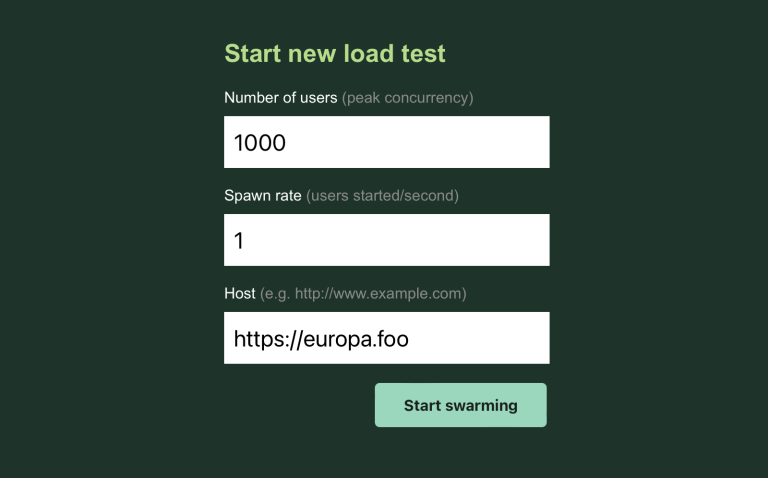
To finally load test each configured site, I’d SSH into the VPS running Locust and run locust. This starts a server on port 8089 ready with the default test script, so you can visit https://my-locust-server.tld:8089 to use the web GUI.
For each test, I specified 1,000 users at a rate of 1 per second, giving it the URL for the Europa front end.
They’re pretty interesting to watch.
Control #
I set up a statically-generated Astro site and load-tested it as a control, assuming nothing would be faster or more straightforward than its plain HTML files. While I repeated this control test on different servers, each one looked like this:
Performance slowed and got a bit shaky about halfway through, but no failures and response times stayed under three seconds:
Stock (unoptimized) #
The stock configuration handles about 2.5 requests per second until things fall apart at 388 users. At 463 users the web server gets really efficient about serving (only) errors:
Cache Tags #
There’s a slow start as Craft is generating its template caches on demand, with requests-per-second similar to the unoptimized stock site.
The cache tags start paying off, though. We get a healthy boost that’s not obvious when visually compared to the previous chart: requests per second stay around 10 – 12 for a while, which is at least four times the unoptimized version. Initial bumps come at 396 users, with a smacking belly flop at 526:
Bear in mind that response times rapidly got uncomfortable, similarly to the unoptimized setup:
Blitz #
Like the cache tags, Blitz has a slow start as it generates its caches on demand. (I did this on purpose, even though Blitz gives you the option of pre-generating its caches.)
Once it’s warmed up, Blitz handles 16 – 20 requests per second until failures start creeping in at 402 users. We’re over a cliff again at 522 users.
Response times are slightly better but it’s not saying much:
Blitz + Rewrite #
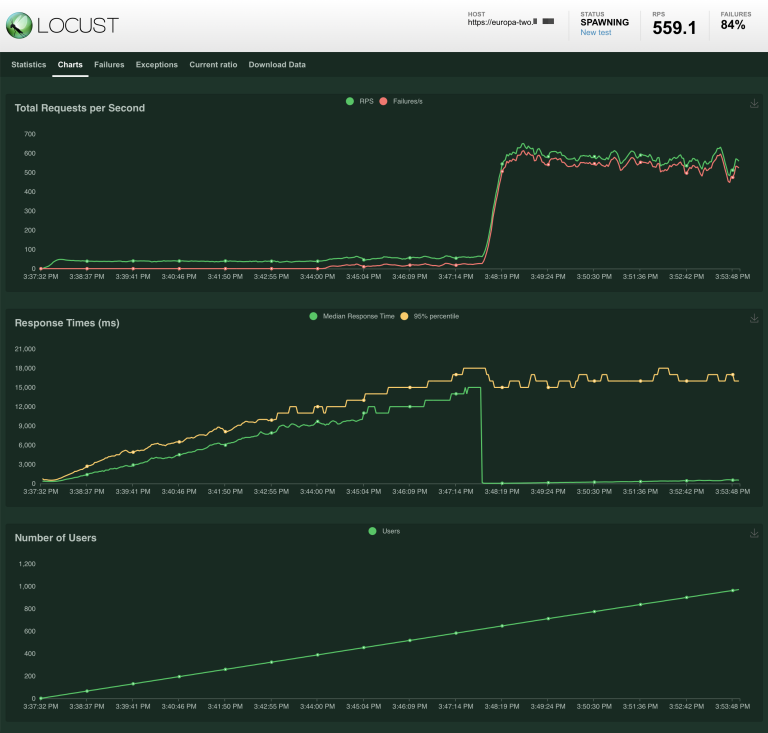
Without pre-warming, the server-rewrite variant has a slow, bouncy start before vastly outperforming the previous configurations and holding steady. Initial requests per second are again at a PHP-ish 3 – 10, but at 68 users they soar to 709 and gradually shrink to a mere 606. Zero failures.
The response times are pretty wild while Blitz is generating its caches, but they stabilize and slow gently under the pressure of more users:
I didn’t think it was fair to compare warmed caches against Craft’s cache tags since Craft doesn’t have a native self-warming ability. But now that we’ve compared apples, here’s the (pre-warmed + load-tested) orange:
This looks roughly like the control test. In fact, to my lasting astonishment, Blitz + Rewrite (warmed) manages to outperform the Astro test by a healthy margin. Blitz peaks at 723 requests per second while a simpler, smaller site doesn’t break 521. I spun up more servers and re-ran tests only to keep finding the same thing. In both cases it’s down to nginx returning HTML, and yet performance is not the same. Surely there’s a reason, I just don’t know what that is yet.
While the difference in scale is alarming, it’s interesting seeing each test’s requests per second together:
The Astro result still confounds me, but it’s clear that nginx can sling static files more efficiently than PHP:
CDN Response Times #
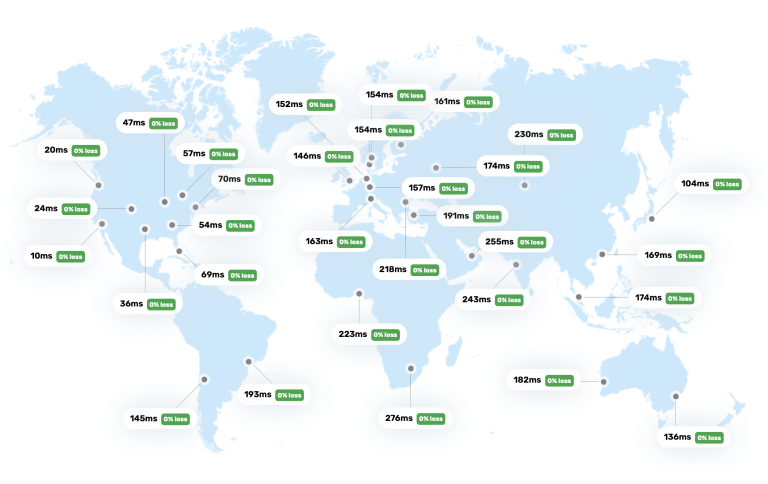
Looking briefly at global response times will illustrate why using a CDN and static caching can be an important benefit for a global audience.
I used a nice tool from SpeedVitals to measure the test site’s response time from around the planet.
The test servers I used were all in San Francisco (United States). A global ping test reveals that the further the pinger, the longer the response. This is the Bare TTFB (time to first byte) below. That number is how long it takes for the first byte of content to come back to the browser. Behind the scenes, the request has to be routed through a network to whatever can give back a response. We have to wait while the call moves through the tubes to the origin server, the origin server comes up with a response, and the response makes its return trip back to our browser.
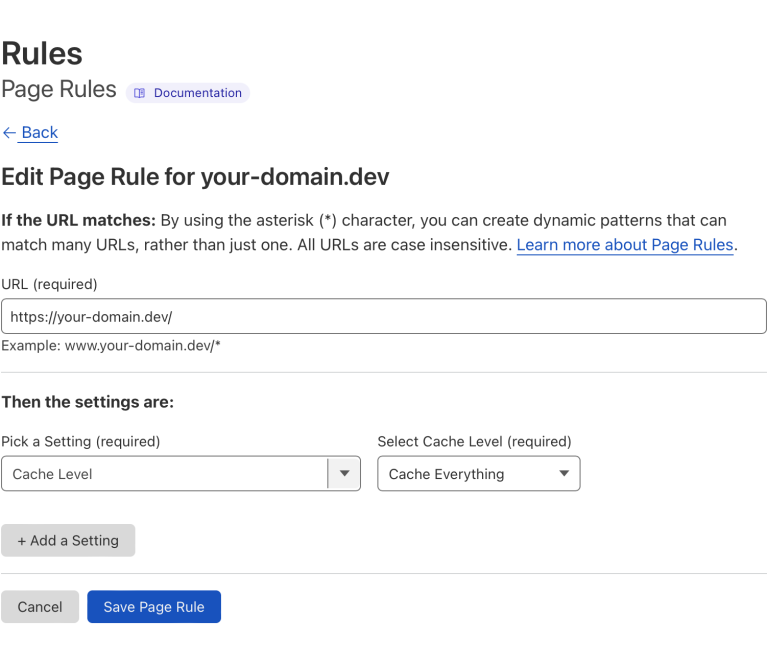
Turning on Cloudflare proxying is simple, and it improves things a little bit by replicating whatever parts of the site it can throughout a network of edge nodes. Whenever possible, each pinger gets a response from something closer and therefore faster. Less tube time. This is the Proxied TTFB below.
When we use a Page Rule to tell Cloudflare to cache everything, we get a more dramatic improvement. This means that when Cloudflare returns content it will honor its cache tag and keep a copy right at the edge, when appropriate, and only make the long trip back to the origin when necessary. Once we’ve told Cloudflare to cache everything and made sure our server sends appropriate cache headers, the San Francisco server starts seeing less traffic while the entire planet has a far better experience with the site. This is the Cached TTFB below.
Once that cache gets warmed up by repeated visits, responses are more consistently cache hits from each nearby edge. The response times make it look like we have a server close to each pinger, which is basically what’s happening. This is the Cached + Warmed TTFB below: all cache hits from each Cloudflare edge.
| Location | Bare TTFB | Proxied TTFB | Cached TTFB | Cached + Warmed TTFB |
|---|---|---|---|---|
| Europe | ||||
| London, UK | 4.4 s | 4.2 s | 618 ms | 71 ms |
| Paris, France | 4.2 s | 3.8 s | 619 ms | 73 ms |
| Sweden | 5 s | 3.5 s | 716 ms | 147 ms |
| Finland | 2.6 s | 1.8 s | 846 ms | 240 ms |
| Belgium | 2.2 s | 2.1 s | 678 ms | 75 ms |
| Madrid, Spain | 3.6 s | 3.2 s | 732 ms | 119 ms |
| Milan, Italy | 3.9 s | 3.5 s | 689 ms | 115 ms |
| Netherlands | 4.8 s | 4 s | 621 ms | 69 ms |
| Warsaw, Poland | 2.3 s | 2.9 s | 756 ms | 77 ms |
| Frankfurt, Germany | 4.7 s | 4.5 s | 657 ms | 92 ms |
| Zurich, Switzerland | 4.1 s | 3.7 s | 819 ms | 106 ms |
| America | ||||
| Las Vegas, US | 3.9 s | 3.4 s | 336 ms | 90 ms |
| Los Angeles, US | 4 s | 3.7 s | 182 ms | 90 ms |
| Iowa, US | 3.2 s | 3.5 s | 386 ms | 114 ms |
| South Carolina, US | 3.8 s | 4.5 s | 485 ms | 150 ms |
| Northern Virginia, US | 4.5 s | 4 s | 469 ms | 67 ms |
| Oregon, US | 3.4 s | 3.7 s | 310 ms | 162 ms |
| Dallas, US | 3.6 s | 3.2 s | 349 ms | 157 ms |
| Montréal, Canada | 4.1 s | 2.6 s | 374 ms | 134 ms |
| Toronto, Canada | 4.3 s | 3.4 s | 360 ms | 89 ms |
| São Paulo, Brazil | 4.1 s | 4.9 s | 746 ms | 46 ms |
| Santiago, Chile | 4.4 s | 3.4 s | 692 ms | 55 ms |
| Asia Pacific & Africa | ||||
| Mumbai, India | 4.1 s | 4.5 s | 988 ms | 328 ms |
| Delhi, India | 5 s | 4.2 s | 1.2 s | 267 ms |
| Taiwan | 4.5 s | 5.2 s | 846 ms | 100 ms |
| Hong Kong | 5.4 s | 3.8 s | 757 ms | 49 ms |
| Tokyo, Japan | 4.4 s | 3.8 s | 485 ms | 34 ms |
| Osaka, Japan | 4.8 s | 3.7 s | 511 ms | 56 ms |
| Seoul, South Korea | 4.4 s | 4 s | 656 ms | 202 ms |
| Singapore | 3.7 s | 3.7 s | 913 ms | 91 ms |
| Jakarta, Indonesia | 4.2 s | 4.1 s | 713 ms | 130 ms |
| Sydney, Australia | 2.3 s | 2.3 s | 627 ms | 47 ms |
| Melbourne, Australia | 2 s | 1.8 s | 702 ms | 104 ms |
| Tel Aviv, Israel | 1.6 s | 1.8 s | 776 ms | 356 ms |
| South Africa | 2.4 s | 2 s | 1.2 s | 214 ms |
Time to first byte is only one aspect of web performance, and some argue it’s a worthless number. In this case, however, it illustrates the benefit of having a fast-responding web server and a warmed CDN.
Side Quests #
I ran into a few unexpected adventures while testing.
Server != Server #
I found that not every Digital Ocean droplet performs the same, even when it’s got the same specs and runs in the same region at the same time of day. I load-tested the statically-generated Astro site to make sure a VPS would behave as expected before running “real” tests, which made it clear that one was just weirdly slow. Spun up another which was fine. 🤷♂️
Pool Tuning #
It’s clear from load-testing results that getting PHP involved is a slowdown.
So I spun up a separate, not-yet-mentioned VPS with 16 CPU cores and 48GB of memory in the name of responsible science. I ran a load test and watched the system’s CPU and memory usage. To my surprise, results looked similar to the other systems except that the CPU usage never got anywhere near 100%. PostgreSQL seemed to yawn. PHP struggled.
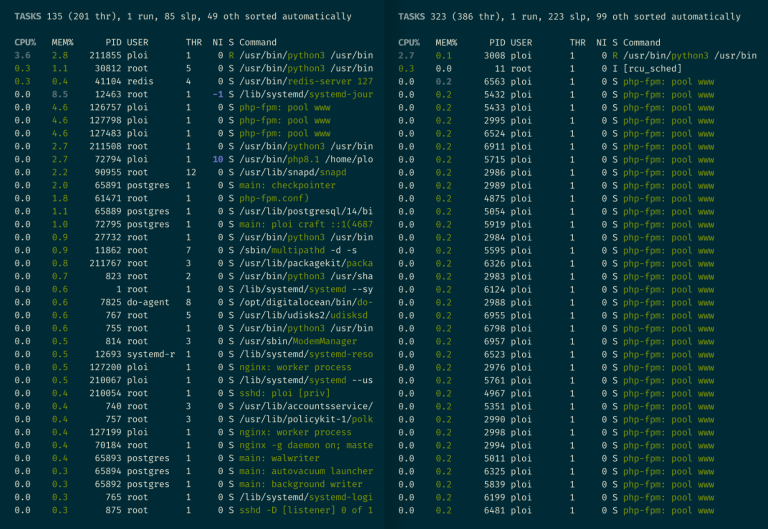
php-fpm processes ready for action with the default pool settings at left. At right, max_children increase readies a bunch more request-takers.The takeaway is that PHP’s pool settings play an important role for the server’s throughput, and they’re easy to change. Follow these instructions with some simple math and you could get a healthy boost that better fits your server’s resources.
I modestly increased my max_children from 5 to 200, the results of which were clearly better despite being less dramatic than I’d hoped.
Upper Limit #
Anybody watching a site happily accommodate 1,000 pretend users without sweating naturally wonders what it’d take to melt the web server.
So I took the Blitz + Rewrite site variant and load-tested again with 10,000 concurrent users and a spawn rate of 10 per second rather than one.
The result? The server remains stable until 1,750 users, when response times start to grow. By 2,650 users responses take over 10 seconds. Approaching 5,000 users, we amazingly have a mere 2% failure rate, but response times were abhorrent and I ended the test.
If you can get a similarly-spec’d server to handle more than 2,500 users with okayish response times, I’d love to know how!
Things Not Done #
There’s still more that Blitz can do for performance we’ve not tested here. It sends appropriate cache headers automatically, and it has the ability to handle compression via gzip and Brotli so it’s not something the web server needs to waste time and resources handling on the fly. It can generate and deploy a static site for you, if that’s your thing.
Blitz 4.3 is bringing support for server side includes (SSI) and edge side includes (ESI), which are static-cache-friendly template partials that can reduce the surface area of what needs to be regenerated.
I completely ignored Blitz Hints — plugin feature and free standalone package—and getting into more careful optimization.
In a perfect world we’d continue on to eager-loading, tweaking your queue and warming settings for optimal performance, and load testing on different kinds of infrastructure — but the tests above took a significant amount of time and hopefully provide some insight and methods you might run with!
Blitz Impact #
You don’t need Blitz to have a performant website.
You can use a static site generator like Astro or Gatsby and deploy directly to a CDN, in exchange for either doing without Craft’s content modeling, or wrangling a headless Craft setup for live preview and any direct client-server interactions your site needs.
You can scale up your hosting infrastructure, in exchange for whatever it costs to configure and maintain. Tuning your web server can improve throughput for its resources. We’ve tested with a single server here, but you can run a bigger server or load-balance to spread traffic across several of them.
You can cache wildly at the edge! Cloudflare can cache your entire site right now with very little work and it’ll be screaming fast, but you’ll need to solve for dynamic content and find a way to purge relevant caches at the right times. You can use the Cloudflare plugin to help with static edge caching if you can live with imprecise invalidation and no multi-site and no ability to generate fresh local caches.
You can use web server features like nginx cache fragments as Andrew demonstrates, and figure out how to handle invalidation on your own.
Blitz doesn’t do anything that can’t be achieved in some other way, it just sits in a sweet spot that’s tightly integrated with Craft and able to support exactly the amount of caching you need in your project — without major changes, if any, to your underlying infrastructure. Every approach comes with tradeoffs, and it offers a careful balance of concerns with ongoing development and support from one of the Craft CMS landscape’s most thoughtful and reliable developers.
I used Blitz for some of my own client projects well before this testing adventure. I was happy to investigate what it would do with a project anyone can look at, and surprised by the magnitude of difference. It took me about an hour more to prep the site with Blitz (versus cache tags) and it would’ve additionally required a $99 license fee to take into production.
If you’re working on a Craft CMS project and you’re after the best possible performance, the numbers alone here should demonstrate that Blitz is worth considering.
You Try! #
Here’s a roundup of stuff we used in case you’d like to try anything yourself. Happy optimizing!
Setup #
- Europa Museum Craft CMS Demo
- Blitz Plugin
- Cloudflare
- Ploi
- Digital Ocean
- Craft CMS
{% cache %}Tag Docs - Configuring PHP-FPM For High Network Traffic